Delivering Secure Tests on iPads

Since we embarked on the iPad journey, a major consideration has been the possibility of secure tests on iPads. Recently, we have been provided with two solutions that we would like to share with you.

GUIDED ACCESS – iOS6

The Guided Access function in the iOS6 update on iPads has made it possible to lock students into an App by disabling the home button and gestures (such as swiping or pinching in) and limiting users to block certain areas of the screen (such as tabs in Safari Browser). The video made by Insanely Great Mac demonstrates the use of the Guided Access function in iOS6 on iPhones. As the function is exactly the same on iPads, this video would be a good introduction to the Guided Access function on iPads:

By locking students into an App (such as Spelling City, BBLearn Mobile and Quizlet) or a website (BBLearn, Sakai etc.) for a test, the teachers can make sure that students will not be able to visit other webpages or refer to other documents stored on iPads. As it can be seen in the video, the Guided Access is enabled by setting a passcode. The passcode will have to be kept private as students would be able to end the Guided Access and lock themselves out of the App/website otherwise. This means that the process can be time consuming as the teacher would have to enter passcode on each iPad one by one. However, the advantages do outweigh the disadvantages. Once the exam is over, the teacher can share the passcode with the students so that each student can end their Guided Access. It is important that the motion is set to ‘off’ so that rotating the iPad would not end the Guided Access function.

ACtest – Core Technology  
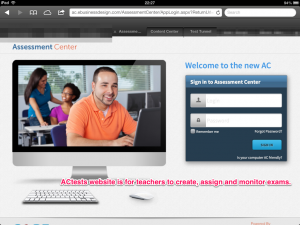
Our institution has purchased a license for AC test from Core Technologies, which also enables us to create and deliver secure exams on iPads. They are secure because once the students log in to the App by entering the password provided, the home button on iPads are disabled. Even if the student did manage to log out of the App, s/he wouldn’t be able to log back in the assessment even with the password, as the teacher would manually have to unlock the student’s exam from his/her iPad following the monitoring function on the website.

By using the website (http://ac.ebusinessdesign.com)  teachers can create items and assessments to be shared with fellow colleagues and students. A time limit and a password can be set for assessment by teachers on the website. Students take these assessments by logging into the ACtests App, which can be downloaded for free from Apple Store. The App is free; however, the students will need enter their institutional usernames and passwords which have been registered with Core Technologies when the license is purchased.

The interface is clean and user-friendly and the students have the ability to see their Answer Sheet at any point during the exam to check which questions they have answered. At the moment, we are in the piloting stage and are collating feedback. However, so far the feedback we have received from our colleagues has been mostly positive.

Platforms for organizing and sharing student and teacher generated materials

3 considerations when iPad is the key vehicle of ESL education

  1. How teachers can share materials such as documents, reading material and exercises from a variety of apps using one platform with students and colleagues?
  2. How students can send assignments, worksheets, multimedia projects etc to their teachers and share them with peers and receive feedback on it?
  3. How students can organize, store and retrieve their work for revision and proof of proficiency purposes?

In this entry, we will generate questions to be researched, although we have no concrete answers as yet.

Due to the wide array of platforms available for the sharing and storing of material, and because of personal preferences, there are many ways of answering questions one to three.  This is empowering, as the various approaches being piloted within our own institution, such as Dropbox, iFiles, Yahoo Docs, E Backpack, Edmodo and Evernote, will lead to a greater understanding of iPadology as an EFL approach.

The questions being asked of each platform are:

1.Can folders and hierarchies of folders be created by teachers and students on the iPad or is it necessary to create them on a laptop or desktop?

2.Can materials be uploaded directly into specific folders or is it necessary to email them to an email account and subsequently upload them into a folder?

3.Which Apps are configured so that users can upload text and multimedia directly from the App into this platform?

4.Can the user specify the exact folder a document will be uploaded into?

5.Is access to a folder provided through a folder share arrangement such as a public folder in Dropbox or a shared folder in Evernote?

6.Can different permissions to edit/delete in specific folders be set for teachers and students?

7.Is there an institutional platform to share materials amongst staff and with students, such as shared drives (WebDav) through iFiles and BBLearn.

8. Is there an App to manage multiple platforms, such as Dropbox, GoogleDocs and WebDav connections under one umbrella?

9. Can students be given access to a single folder or file via an emailed link?

10. Can students delete, edit or view the work of other students before a homework turn in deadline has expired?

11. Can the teacher give immediate feedback within the same App?

12. If the teachers’ account in a platform, such as Dropbox, Everbox or eBackpack expires, how can students still have access to their work they have uploaded there?

13. What is the storage capacity of the free version of this platform?

14. How much does the paid version cost and how large if the storage capacity/ the number of students it encompasses?

15. Can files be rearranged by tags, dates, Apps types etc?

16. Can student work stored within a platform be edited by the teacher or peers? Can different permissions be used for specific folders?

17. What form does this editing take?

18. Can edited/ marked student work be resaved within the same platform, without necessitating emailing back to the student and resaving on their part?

19. Should students be at liberty to organize their folders within the platforms and iPad pane Apps that are used in class according to their own preferences? Will this vary according to iPad and/or language level proficiency?

Our aim over the next several of months is to answer these questions we welcome your comments, suggestions and examples drawn from your experiences.


Decisions, decisions..


We’ve been exploring different ways which would allow us to share documents with our students in a way in which we can avoid busy e-mail exchange and enable co-editing via iPads. Here are some of our initial findings:


1. Google Docs is a great tool for sharing documents that can be co-edited. However, sharing via iPads requires sending e-mails and there doesn’t seem to be an option to create ‘folders’ via iPads. Our students will have iPads only. Gdocs can be used to create iBooks on Creative Book Builder and share via sending Gdocs link which would allow the students to open the book in iBooks (magically appearing on the shelf!). It is also possible to have the students visit the shared Dropbox folder to download the iBook. However, these books would be read only.

2. Dropbox,as mentioned above, allows us to create shared folders. However, uploading any documents rather than video and photos seem to be impossible on iPads. Why can one not drag and drop a Pages or Keynote file to Dropbox? We’ve tried creating files on Pages and Keynote. The options for sharing them were WebDav, iDisk and e-mailing. Unfortunately, there is no built-in option to share them via Dropbox.

3. WebDav: we don’t know a lot about this option yet. Pages and Keynote have a built in function to share docs on WevDav. However, these seem to be read only files only. No co-editing, again..

4. Evernote: What a fantastic tool! We’ve both been using Evernote to organize our personal and work e-mails and notes.. And yes, we love it! Using Evernote with the students is something we are excited to try for the first time in September (Watch this space!). As far as we know, our students will have the free version of Evernote installed on their iPads and co-editing is not allowed in this version.

Please do make suggestions and share comments on this. We really need some tips and suggestions at this point!

Decisions, decisions.. So many of them to make, yet so little time and information.. We are starting our summer holiday this Friday and will be back at work late August. The new semester stars early September! Quite a challenge but we are up for it! 🙂

Some considerations when starting to teach through iPads.

Main areas of concern

  • Delivering content material to students in an organized, easily retrievable system.
  • Using Apps and files students can interact with i.e. Write answers down on, record answers orally on etc.
  • Students filing content material and their own work in an organized easily retrievable system.
  • Students sharing material with their teachers and peers.
  • Security of material, student work and participant rights and self-esteem.
  • Going beyond the pen and paper interface. Creating empowering new ways of teaching and learning.
  • Material selection, course design, matching Apps to learning outcomes.
  • Classroom dynamics, classroom management systems and keeping students task focused.
  • Training and supporting teachers.
  • Effective sharing of materials, best practices etc. to reduce time spent on lesson planning.

Things to do as a teacher starting to work with iPads in class.

  1. Save a table for usernames and passwords.
  2. Have an administration folder.
  3. Have a core list of Apps that both students and teachers have.  Categorize Apps according to their main functionality: for input of language and ideas, for production.
  4. Have storage and share facilities such as Drop Box, Evernote and Google Docs on both your laptop and iPad.
  5. Use an App that can access files on both your laptop and iPad and if possible your institutions Share drive.  E.g. Splash Top Remote Client, Touch Pad.
  6. Synchronize iPad and overhead projector using Air Server or Air Play
  7. Decide on and create overall folder organization.
  8. Decide on tagging system for files to be saved. This ensures easy retrieval. Display this for easy access so you can adhere to the system.
  9. Identify a list of iPad related core vocabulary and skills. Develop materials to teach these and ‘can do lists’ for students to identify their areas of proficiency and weakness.
  10. Add and iPad Training element to ESL lesson plans.
  11. Have a troubleshooting poster in the classroom e.g.’ Remember to …’. Co-produce this with students.
  12. Have an Apps Champion List per class which develops and the semester unfolds.

Things to do as students starting to work with iPads in class.

  1. Create overall folder organization.
  2. Have an administration folder separate to course work.
  3. Have an iPad and technology training folder.
  4. Save a table for usernames and passwords.
  5. Arrange Apps into their main functionality: for input of language and ideas, for production.
  6. Display tagging system for easy retrieval in a place of easy access so students can adhere to the system.